Translate this page into your language

Wednesday 13 August 2014

Model horse tips and tricks

Hi! I kind of discovered this little tip/trick thing while I've been away. I brought Darkness with me (pics in this tutorial of him) but only brought his fleece rug, so when I wanted to turn him out in the garden, I realised that there was a flaw in the plan. Felt does not cooperate with rain! I decided that there was a way round this. I grabbed my materials and started off! This is how to do it...

You will need:
Model horse
Cling film or tin foil (latter is better)

Let's get started!

1. Cut a piece of your material that is bigger than your model. It doesn't matter if it's oddly shaped or anything.

2. Wrap it round your model where a rug would be. Trim any odd looking pieces that stick out. If your horse has a fancy tail that you want to keep nice, make an extra tail flap like the one Darkness has.

3. Mould it around your model so it fits really tightly. Then when you take it off the foil will be the shape of your model!

4. And you're done! Your horse should be able to be turned out safely now without getting wet. Try it, and comment below if it worked for you. If it didn't, just tell me where the model got wet and I'll adjust my tutorial accordingly. Bye!

Tuesday 12 August 2014

Show jumps reference pictures

YHi! Sorry that I haven't posted for what feels like ages, it's just I'm away and didn't bring my tack stuff with me. I thought that doing reference pictures should make up for it, and when I get back home I'll be able to make a tutorial for them. Anyway...

In show jumping you can have... Oxers or parallel bars. The horse has to reach for them quite a lot so if you've got a stretching out jumping model, this is best for it.

Planks. Planks are balanced on very light cups - careful looking jumpers need this kind of fence. They may be harder to make but you will probably get better marks in performance showing.

Uprights. Uprights are harder for the horse to judge as there is no ground line and the horse has to jump up, not out. Never underestimate uprights! Another fence for careful jumpers.


Wall jumps. Walls are not real walls, just plastic bricks that are easily knocked off, or fillers like this fence. They are easier for the horse, as are usually quite wide and have a ground line. One for big, bold looking horses, or if you have a model with a big, open canter stride that could be approaching the fence.

Stile or skinny fence. These fences are extremely difficult to ride. They are very narrow, so the horse can easily run out on worry of not fitting through. The Schleich Lusitano gelding looks like he's running out, so he'd be quite a cool fun set up.

In quite a few showjumping courses, there are fences designed to challenge the horse's bravery. Fillers in particular, are the scariest of them all. This fence below has a strange Halloween catty theme. Excuse the volume mute thing, I was on an iPad!

I hope these reference pictures prove useful. Hopefully I can do a jumps tutorial soon! 
Bye!

Wednesday 6 August 2014

I saw the sign (and lots of creativity!)

Hi! I got creative yesterday, and bored, so I decided that I could make some signs for my stables. Here they are! I'll try and do a tutorial tomorrow, but I might not be able to blog at all. :( Anyway...

Horse Trail sign
Multi - Use Trail sign (my newbie Kingsbridge Diomedes photo-bombs!)
Caution - horse riding sign

I couldn't resist having a photo of the carriage I made, with Kingsbridge of course!


Directions to the arenas and yards!


STOP Are your children under control sign!


In addition to the yellow sign, this goes near the eventing yard - where all the mad horses go!


Goes outside the indoor school
Goes outside the Olympic Arena - the door must be closed!


Tuesday 5 August 2014

Exercise sheet tutorial

Every now and then I've come across horses wearing exercise sheets, and the horse I ride wears one when it rains (which it does a lot in the winter). You can get fluorescent ones for the road, and waterproof ones. I thought a waterproof one would be cool, so here's the tutorial.

You will need:
Waterproof material (Amazon is the key!)
Lobster clasps
Jump rings
Felt (sticky backed does the trick really well)

Let's get started:

1. Cut a rough rectangle out of your waterproof material. It doesn't matter if the cutting isn't exactly accurate, but it shouldn't be all over the place (mine is a bit, but it doesn't really matter!)


2. Measure the sheet on your horse. It should be about halfway down your horse's body but if you want you can make it longer.


3. It's quite tricky to see in my rubbish photos, but I have stuck my sticky backed felt onto the back of my sheet. This creates a nice lining and prevents your model being scratched, and it also makes things look nice and realistic.


4. You can't see very well, but I've marked out two lines where the girth goes. Look to the next step about why we do this.
5. Take ribbon, leather lace, leather strips, elastic, anything along those lines and make a little loop like this. The girth (or the girth straps, if it's a dressage saddle) will go through these loops and make sure everything stays on well, otherwise the whole sheet would slide about and get really annoying. 
6. Open a jump ring and put on a lobster clasp, then glue a leather strip to the jump ring. Glue it to the end of the sheet, as this will go underneath the tail. Before you glue it, have a look at the end result so you know what it's supposed to look like; best to get it right first time!
7. Thread a jump ring through a leather strip and glue it. Then glue it on to the other side of the sheet where the tail strap will clip on. Check the fit before gluing, and make sure it is snug but not too tight. If it's too loose the sheet will just slide off the tail end!
8. And you are finished! Get a saddle, put it on and see how it looks. Please comment so I can see how I'm doing, and give me some tips on how I could improve. Ideas for tutorials or if you need any help or anything would be great! See you tomorrow for another tutorial!

Hunting breastplate (a running martingale which also acts as a breastplate) tutorial

Hi! As promised, here is the hunting breastplate tutorial. It is part of my tack set tutorials group, and I am doing it on Totilas (him being the model for my recent tutorials). You can use ribbon and leather lace as an alternative for what I'm using. Anyway...

You will need:
Leather strips (cut long, thin ones which are as equal as you can make them)
Jump rings (6mm is the best for all scales)
Sticky backed felt (white looks best) or normal felt
Lobster clasps
A model horse of any scale (I'm using Traditional scale)
A glue gun or some reliable glue

Let's get started!

1. Have your leather strips ready and waiting so you can do everything easily. Thread a jump ring through one of your leather strips and glue it. Trim away excess glue and leather from the sides of the jump ring if needed.


2. Measure around the neck of the horse, slightly above the withers, and give a little slack (a bit more than the width of the jump ring) for gluing.
3. Glue the leather strip around the same jump ring so you have a complete neck strap.
This is what the finished neck strap should look like

4. Glue a leather strip to the jump ring, but make sure it faces downwards. This is the strap that goes between the front legs and loops around the girth.

5. Make a simple loop at the end of the strap in step 4 and glue it. This should be wide enough for your girth.
6. Make the martingale straps - the reins will go through the jump rings. Glue a jump ring to a strip of leather and glue it on to the ring. Repeat on the other side. If you don't have enough room, cut the strap thin where you are gluing it but make sure it is the full thickness at the part that you can see.
7. Glue a very short piece of leather on your neck strap, ideally around the height where your saddle's D rings are (where the lobster clasps attach to). Repeat on the other side and make sure they are equal.

              
  8. Glue jump rings to the short leather pieces.
9. Open the jump ring and slip on your lobster clasp. If you like you can do it before you glue it on. I find doing it after better as then the lobster clasp doesn't swing about and get in your way. It's your preference!
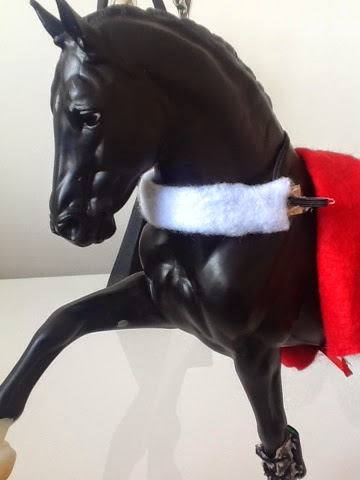
10. Glue your felt or sticky backed felt to the jump ring. This prevents the jump ring scratching your model, and it also looks cool as that is what real breastplates and hunting breastplates have!
11. This is an optional step but it looks quite cool, especially with horses that look spooky or out of control. Glue a little extra neck strap, but just the top half. Have a look at real breastplates and you'll notice they have them too!
12. And you are done! Make sure your saddle has D rings first so you can clip the lobster clasps on to those.
Thanks for looking at my tutorial! Have a look tomorrow around this time (4ish) and see what I've put up!
Bye!


Sunday 3 August 2014

Update on Totilas' tack

Hi! I can't do a tutorial today, but I promise one tomorrow! Anyway, I've completely forgotten about updating you on Totilas' tack, so I think it's about time. Here are the pictures... See you tomorrow for a tutorial, I think I'll do one on running martingales.

The metal things are supposed to be stirrup bars!

The finished saddle seat and saddle skirts, complete with sparkly studs that will be on his browband.

It's not glued on yet, but it's a start. I can't wait till the show!

See you for the tutorial!

Saturday 2 August 2014

Breastgirth tutorial

Hi! I decided that making a breastgirth would be quite cool. They aren't difficult at all, and are very hard wearing. You could adapt this tutorial for a harness and other things like that. Anyway...

You will need:
Leather
Sticky backed felt or normal felt (white looks best)
Elastic
A model horse of any scale
A glue gun or some reliable glue

Let's get started!

1. Measure across your model horse's chest, from around where the saddle sits to the other side of the horse. Make sure they are even, and cut a thick leather strip of that length.

2. Leave off a little bit of leather space of both sides at the ends, and wrap your felt around so the leather is completely covered apart from where you left the space at the ends. 
3. Flip your breastgirth over and glue a length of elastic which will be the neck strap. It should fit over the neck like this:

4. Glue a loop of elastic at the end of the strap (see pic below) length depending on your model's scale, which will slot around the girth. Repeat on the other side. 
5. And you are done! Put a saddle on (I will eventually do a tutorial!) put the elastic loops round the girth straps and your model horse's saddle won't slip back any more! They also look very smart.
Thank you for looking at my blog and this tutorial. Have a lookout at tomorrow's blog for more tutorials! 

Friday 1 August 2014

Show jumping or open fronted boots tutorial

Hi! After the reference pictures yesterday, I thought making a boots tutorial would be nice. I am doing it on Totilas, so it will be a bigger scale. If you are doing it below traditional scale, then you can adapt the tutorial for just one Velcro strap or something like that. I'll take you through one boot, so you can use the tutorial for one more, or all four if you like! Anyway...

You will need:
Leather
Velcro
Craft foam (or other colour or kind of leather)
A model horse of any scale
Glue gun or reliable glue

Let's get started:

1. Take your leather and cut out the pattern in the picture below.

2. Check the fit of the boot on the horse, for example Totilas' is a little bit too wide. Trim it down if needed. 
3. Take your craft foam and cut a wide strip which fits in the groove of the boot like this:
4. Wrap the craft foam strip in thin leather, and make sure it is tight. Then glue the back of it on to the middle of the boot, so the bit with the slight dip is covered. Look to the picture below.
5. Cut two strips of elastic and glue them on to the left of the protection piece like this:
6. Glue the spiky side of the Velcro on to the end of the straps, making sure that the Velcro faces the other direction, like this:

7. Glue the fuzzy side of the Velcro on the other side of the boot. Line the straps and the fuzzy Velcro up. 
8. And you're finished! Make another boot and you'll have two!

Thank you for looking at this tutorial. Sorry about the picture quality! Please comment, so I know how I'm doing! See you tomorrow for another tutorial!